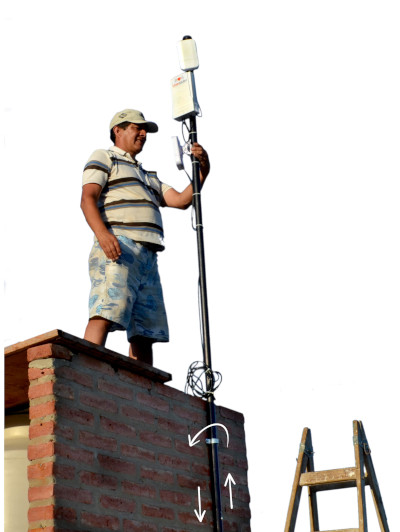
The video gives a step by step example about how to set up a LibreRouter node on the wall.
In addition, the following tips will help with the correct placement of the LibreRouter node. It is necessary to take them into account to set it up for the first time and also to use it as a control guide of maintenance
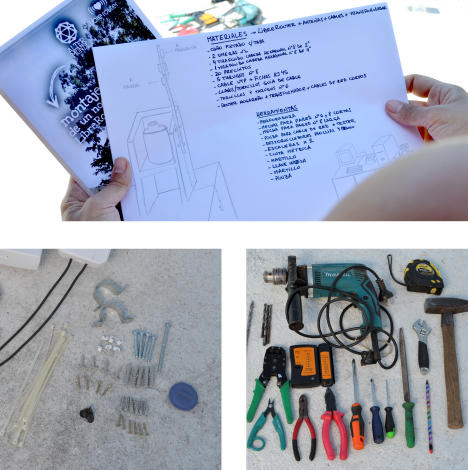
Prepare the materials and tools
- To draw the complete installation to prepare all the necessary elements is a good practice.
- Materials: Screws, dowels, tubular pipe, pipe fasteners, cable and network plugs, seals and wire.
- Tools: Screwdrivers or wrenches, drill with short bits, a long bit to go through walls, pliers, cutter, crimping pliers to assemble the network cable, among other tools. If necessary, have special items or clothing, such as safety shoes, ropes, harness or ladders.
Recommendations for outdoor installation
The following are some recommendations for a correct placement of the node. These requirements are general. It is important to comply with them regardless the type and place of installation.
- The node must be firm: all the joints and parts of the node must be tight and stable.
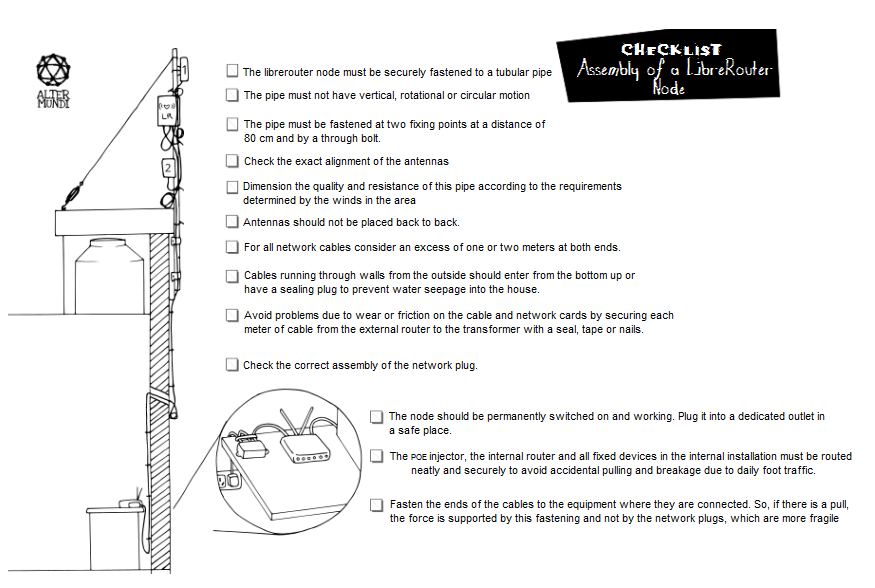
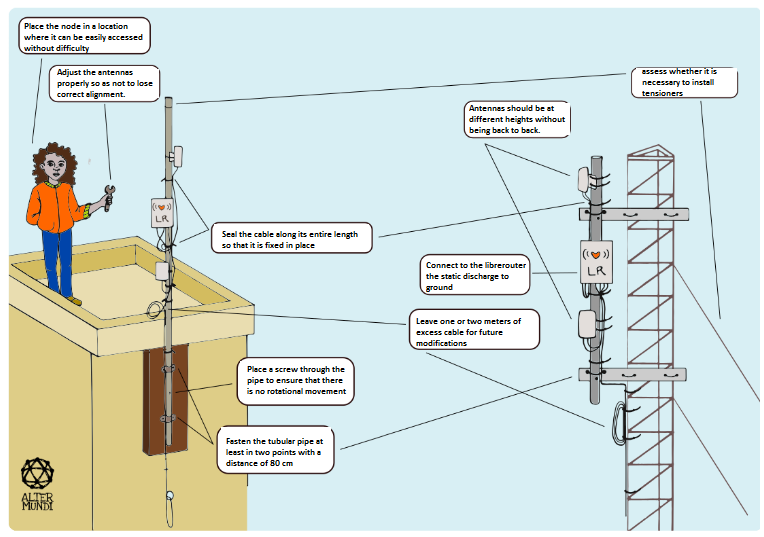
- The pipe must not have vertical, rotational or circular movement. This keeps the antennas in alignment, avoids vibrations that effect the equipment, and keeps the node in place even during heavy storms. To prevent rotation, a screw can be placed through the pipe and fastened to the wall.
- The pipe must be fixed at a minimum of two fixing points, at a distance of 80 cm from each other.
- Fasten the antennas firmly to a tubular pipe to allow their exact alignment.
- The antennas should not be placed back to back because they emit part of the energy backwards and interfere with each other.
- Materials should withstand inclement weather. For example: if it is a place with saltpeter, use hardware with protection against rust; or if it is a network on the banks of a river, ensure the tightness of the boxes protecting the LibreRouter.
- Dimension the quality and resistance of the pipe and its fastenings according to the requirements determined by the winds in the area. Consider if it is necessary to support it with tensors.
- Place the node in a location where it can be easily accessed without difficulty. This allows people to work at heights that are comfortable and easy to reach. Very high towers or pipe assemblies must be well justified.
- Consider a surplus of one or two meters at both ends for all network cables. This allows repairing the chips or move the node out of place without having to lay a new cable.
- Cables entering the building must enter from the bottom up or have a sealing plug to prevent water leaks inside the house. It is also useful to make the perforation in the wall so that it is inclined with the high part on the inside.
Preventing problems due to wear and tear on the cable and network plugs
- Use outdoor quality cable SFTP.
- Guide the wired installation meter by meter, from end to end.
- In overhead wired links it is necessary to place a supporting wire so that the cable does not stretch or sag, avoiding friction and static accumulation.
- Check for friction against walls, chimneys, roof edges or other surfaces.
- Check the correct assembly and condition of the network plug. This instruction manual will be very useful or watch this video.
- Make a loop with the cable near the end and fasten it to the pipe to protect the network plugs. This is a recommended method that avoids the small and permanent movements that wear out the equipment connectors.
- Network cable connections of up to approximately 100 meters can be made. If a long connection shows faults or intermittency, remember this as a possible cause.
Common problems
The most frequent problems in a network arise from a lack of attention to detail. Following these tips reduces failures caused by unstable installations and improves the performance of the community network.
- It is very important that the node is permanently switched on and working. It is recommended that it should be plugged into a dedicated outlet in a safe place.
- Evaluate in each case whether it is convenient to have a power stabilizer or a UPS.
- The cables of the PoE injector, the internal router and all fixed devices in the internal installation must be routed neatly and securely to avoid accidental pulling and breakage due to daily foot traffic.
- Fasten the ends of the cables to the equipment where they are connected. So, if there is a pull, the force is supported by this fastening and not by the network plugs, which are more fragile.
We recommend to periodically check the condition of the node. Especially after storms which may cause wear, movement or breakage.
The following checklist can be followed for the correct placement of a LibreRouter node.